This vegetable biryani pulao recipe takes two Indian classics, the flavorful biryani and the light & easy veg pulao, and merges them into one incredible dish! But forget mushy rice – I’m sharing all my secrets to achieving perfectly cooked grains, fluffy and separate, every single time. This one-pot wonder is a healthy enthusiast’s dream – packed with delicious veggies and bursting with flavor, but without the heaviness.
")
Recipe video
Difference between pulao and biryani
There are several versions of both pulao and biriyani, but there are some distinct differences in the way both are prepared.
Biryani is made with an abundance of whole spices as well as ground ones.
Rice is parboiled in lots of water and drained. Vegetables are sauteed and cooked with spices separately.
The partially cooked vegetables are topped with a layer of parboiled rice and herbs. They are then cooked in a tightly covered pot.
This technique is called “dum cooking“. There are also other ways of cooking biryani, like in a pressure cooker or instant pot.
Pulao is much easier to cook than biryani. It is usually a one-pot dish and uses absorption method.
Vegetables, rice, spices and herbs are sauteed and boiled together. The rice gets cooked by absorbing the water.
Aromatic spices are sparingly used in a pulao recipe. It is milder in flavor and lighter on your stomach.
")
Why you’ll love this biryani pulao recipe
This recipe combines the amazing flavors of biryani and the easy cooking technique of pulao. The end result is a simple healthy “one pot biryani“. It’s a win-win!
Have you experienced biryani with mushy rice?
I have, during my early days of cooking. I was literally in tears when the biryani turned out like porridge!
Next time I reduced the amount of water and it got burnt and stuck to the bottom. I stopped using the pressure cooker for a while, thinking that was the problem 🙂
If the rice in biryani (or pulao) is sticking to each other, it is simply not a biryani. In a good biryani the rice grains are separated from each other and visible to the eyes.
Through the years I learnt a few techniques to make aromatic biryani pulao that ALWAYS turns out fluffy with beautiful separate grains of rice.
Basmathi rice cooks faster than regular rice. Details like soaking the rice, quantity of water, cooking time and when to add various spices are important to cook biryani the right way.
Once you know these small details, you can master the technique of cooking biryani and pulao. Or even the Mexican-inspired cilantro lime basmati rice.
My step by step instructions will help you make the BEST biryani pulao with EASE.
Ingredients
(You can find the exact measurements and instructions in the printable recipe card at the end of this page. Here are step-by-step instructions with pictures to help you easily understand the recipe.)
To get our heads around just how exciting this biriyani pulao is, let’s walk through the ingredients and what they each bring:
")
- Rice: Good quality basmathi rice. It is even better if it’s labelled “aged basmathi”.
- Ghee and oil: Adding both makes the pulao aromatic, while limiting the amount of saturated fat.
- Whole spices: Saffron, star anise, cinnamon stick, cloves, green cardamom, black cardamom and fennel seeds.
- Black cardamom is bigger and has a more intense flavor. If you can’t find it, use 3 green cardamoms instead.
- Ground spices: Chili, coriander, turmeric and garam masala. Red chili powder can be replaced with cayenne pepper. You can use store bought biryani masala instead of garam masala.
- Yogurt: Replaces coconut milk. It adds more flavor and health benefits to the biriyani with less calories.
- Fresh vegetables: Carrots, beans, cauliflower and green peas.
- Fresh herbs: Herbs and spices are the heart and soul of this biryani pulao. Add mint and coriander leaves while cooking the rice and also for garnishing.
- Important to note: DO NOT THROW AWAY THE STEMS OF CORIANDER AND MINT LEAVES. We make the most of the herb flavors in this recipe. (I use them in recipes like lemon coriander soup with chicken and creamy chicken kofta curry.
- Other flavor makers: Onions, tomatoes and ginger garlic paste. (You can use ½ teaspoon each of grated ginger and garlic instead of ginger garlic paste.)
How to make biriyani pulao: step by step
Soak
Rinse basmathi rice and let it soak in water for 20 minutes. Soak a few strands of saffron in hot milk in a small bowl.
Meanwhile you can prepare the rest of the ingredients.
Saute
Heat ghee and oil in a large pot. Drop in whole spices: bay leaf, cloves, cinnamon, cardamam and black cardamom. Roast the spices on low heat for a couple of minutes.
")
Add fennel seeds. Roast for a minute.
")
Dice the onion finely. Slit the green chilies horizontally. Add them to the pot and saute on medium heat.
")
Once the onions turn translucent, add ginger-garlic paste.
")
Stir for a couple of minutes until the raw smell disappears. Add finely diced tomatoes.
")
Saute until the tomatoes are cooked and turn mushy.
Add beans, carrots, green peas, cauliflower and coriander stems. Saute for about 5 minutes on medium heat.
")
Add ground spices: chili powder, coriander powder and turmeric. Stir for a couple of minutes.
")
Add yogurt (or homemade hung curd). Saute until the excess water evaporates and the masala turns thick.
")
This step is important for 2 reasons:
- If there is excess moisture, the biryani pulao might turn out mushy.
- Basmathi rice cooks faster than the veggies. This step helps in partially cooking the vegetables before adding the rice.
")
Boil
Drain the soaked basmathi rice and add to the pot. Saute on medium flame for 5 minutes.
")
Add hot water to the rice and vegetables.
")
Add saffron with the milk it was soaked in.
Sprinkle garam masala and finely chopped mint and coriander leaves.
")
Tie the mint stems together with a kitchen string. Drop it inside the pot.
")
Increase the heat to high. It would soon start boiling.
Cover the pot with a lid and reduce the flame. Cook undisturbed on low flame for 10 minutes.
Turn off the stove and let it rest.
")
Garnish and serve
After 10 minutes, open the pot. Remove and discard the bunch of mint stalks.
You can find the whole spices right on top. You can remove them too if you want.
")
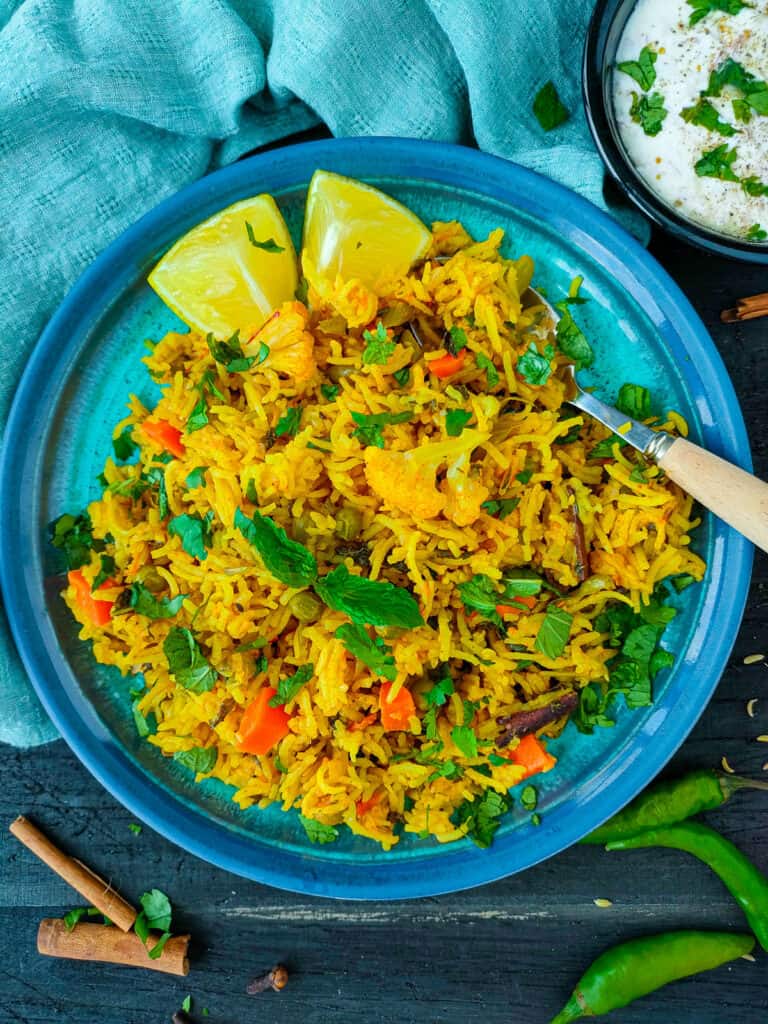
Fluff the rice with a fork. Garnish with more herbs and enjoy!
Recipe tips
This pulao biryani recipe is quite straight forward. But there are a few things to note which I repeat here:
- Soak rice: Soak basmathi rice for at least 20 minutes.
- Hot water: While cooking the rice, make sure you add water that is piping hot.
- Quantity of water: For this veg biryani recipe, the right rice to water ratio is 1:1¾ when cooking in a pot. There must be enough water to avoid the pulao getting burnt or sticking to the bottom. Too much water will make the rice mushy.
- Fresh herbs: Do not skimp on herbs. Use a lavish sprinkling for maximum flavor. MORE HERBS + SPICES = MORE FLAVOR.
- Instant pot/pressure cooker/electric cooker: This recipe is for cooking pulao biryani in a pot on stove top. The quantity of water and cooking time have to be tweaked for other modes of cooking. If you need instructions, please let me know in the comments section below.
- Serving size: This recipe can be tweaked to suit the number of people you’re serving. (Please use the scale in the recipe card.)
- Storing: This veg biryani pulao stays fresh for about 4 days in the refrigerator and about a month in the freezer. Store it in an airtight container and thaw in the fridge overnight before you reheat.
- Reheating: Sprinkle 2 teaspoons of hot water on the biryani and toss. Reheat in the microwave in a large covered bowl.
")
Variations and additions
- Fried onions: Roast thin onion slices in oil until golden brown. Use low heat and stir frequently. Sprinkle on the cooked biryani pulao. (I prefer these caramelised onions to deep-fried ones.)
- Ghee (clarified butter): Sprinkle a teaspoon of ghee on the cooked pulao biryani for maximum flavor and aroma.
- Lemon juice: Sprinkle a tablespoon for some zesty flavor.
Looking for an even easier rice recipe? Try this beginner-friendly capsicum fried rice.
What to pair with vegetable pulao biryani
You can serve this pulao biryani with a simple raitha as a vegetarian main course. You can also serve it as a side for seafood like prawn roast or easy golden fried prawns.
You can also pair it with side dishes like:
This veg biryani pulao tastes amazing with tandoori, tikka and kababs:
")
One Pot Vegetable Biryani Pulao Recipe
Ingredients
- 1 cup Basmathi rice
- 1 teaspoon ghee or melted butter
- 1 teaspoon olive oil
Whole spices
- 2 bay leaves
- 1 star anise
- 2 cloves
- 1 inch cinnamon stick
- 2 pods cardamom
- 1 pod black cardamom
- 1 teaspoon fennel seeds
- a few strands saffron
Ground spices
- 1 teaspoon chili powder or cayenne pepper
- 1 teaspoon coriander powder
- ¼ teaspoon turmeric
- ¼ teaspoon garam masala
Vegetables
- ¼ cup diced carrot
- ¼ cup chopped beans
- ¼ cup cauliflower florets
- ¼ cup green peas
- 1 onion, finely diced
- 2 green chilies, slit horizontally
- 1 tomato, finely diced
- 1 teaspoon ginger-garlic paste
Others
- ½ cup yogurt
- 1 tablespoon milk
- 1¾ cup hot water
- ½ bunch mint leaves (¼ cup packed) with stems
- ½ bunch coriander leaves (¼ cup packed) with stems
To serve
- 1 cup onion or cucumber raitha
STEP BY STEP IMAGES
Scroll back to find detailed recipe photos!
Instructions
Soak
- Rinse 1 cup Basmathi rice and let it soak in water for 20 minutes. Heat 1 tablespoon milk in a small bowl and add a few strands saffron to 1 tablespoon milkt. Let it soak.
Sauté
- Heat 1 teaspoon ghee or melted butter and 1 teaspoon olive oil in a large pot.
- Drop in whole spices: 2 bay leaves, 1 star anise, 2 cloves, 1 inch cinnamon stick, 2 pods cardamom and 1 pod black cardamom.Roast the spices on low heat for a couple of minutes.
- Add 1 teaspoon fennel seeds. Roast for a minute.
- Stir in 1 onion, finely diced and 2 green chilies, slit horizontally. Sauté on medium heat.
- Once the onions turn translucent, add 1 teaspoon ginger-garlic paste. Stir for a couple of minutes until the raw smell disappears.
- Add 1 tomato, finely diced. Saute until the tomatoes are cooked and turn mushy.
- Add the vegetables: ¼ cup diced carrot, ¼ cup chopped beans, ¼ cup cauliflower florets¼ cup cauliflower florets, ¼ cup green peas and coriander stems. Saute for about 5 minutes on medium heat.
- Add ground spices: 1 teaspoon chili powder, 1 teaspoon coriander powder¼ teaspoon turmeric. Stir for a couple of minutes.
- Add ½ cup yogurt (or homemade hung curd). Saute until the excess water evaporates and the masala turns thick.
- Drain the soaked basmathi rice and add to the pot. Saute on medium flame for 5 minutes.
Boil
- Add 1¾ cups of hot water to the rice and vegetables. Add saffron with the milk it was soaked in.
- Sprinkle ¼ teaspoon garam masala and finely chopped ½ bunch mint leaves (¼ cup packed) and ½ bunch coriander leaves (¼ cup packed).
- Tie the mint stems together with a kitchen string. Drop it inside the pot. Increase the heat to high. It would soon start boiling.
- Cover the pot with a lid and reduce the flame. Cook undisturbed on low flame for 10 minutes.Turn off the stove and let it rest.
Garnish and serve
- After 10 minutes, open the pot. Remove and discard the bunch of mint stalks.
- Fluff the rice with a fork. Garnish with more herbs.
- Enjoy with onion or cucumber raitha.
Video
Notes
- Rice: Use good quality basmathi rice. It is even better if it’s labelled “aged basmathi”.
- Ghee and oil: Adding both makes the pulao aromatic, while limiting the amount of saturated fat.
- Black cardamom is bigger and has a more intense flavor. If you can’t find it, use 3 green cardamoms instead.
- Ground spices: Red chili powder can be replaced with cayenne pepper. You can use store bought biryani masala instead of garam masala.
- Ginger garlic paste: You can use ½ teaspoon each of grated ginger and garlic instead of ginger garlic paste.
- Soak rice: Soak basmathi rice for at least 20 minutes.
- Hot water: While cooking the rice, make sure you add water that is piping hot.
- Quantity of water: For this veg biryani recipe, the right rice to water ratio is 1:1¾ when cooking in a pot. There must be enough water to avoid the pulao getting burnt or sticking to the bottom. Too much water will make the rice mushy.
- Fresh herbs: Do not skimp on herbs. Use a lavish sprinkling for maximum flavor.
- For more tips, see the post above.
★★★★★Did you try this recipe? Please give a star rating in the comments below ★★★★★
HUNGRY FOR MORE? Join over 1000 home cooks like you who subscribe to my weekly newsletter to get all the latest recipes right in your inbox. Or follow me on your favorite social media: Facebook, Pinterest, Instagram, and YouTube. Thank you and happy cooking!
")
Thank you for the wonderful recipe, I made it multiple times and it came out deliciously every time!
Thank you, Todd for trying out the recipe. I’m glad you liked it!